Multithreading in C++: Approximating PI
September 2022 (4883 Words, 28 Minutes)
 “She didn’t anticipate the yarn fighting back”
Hi, I’m Oleg, I’m a freshly graduated Audio Games Programming Bachelor and while reviewing C++ multithreading,
I’ve decided to share with you this little project that introduces you to the basics of multithreading and multiprocesing in C++.
This an unavoidable part of any modern programmer’s job, be it performance critical or not, contrary to what some might assume when initially introduced to the concept, multithreading is not used only to make your code run faster, althouogh it is exactly the goal we’ll be pursuing in this blogpost’s particular case.
By the end of this blogpost, you’ll hopefully understand the subject better and understand when it does and does not make sense to take advantage of a multithreaded and / or multiprocessing architecture (one does not imply the other!)
Note that in this particular blogpost we won’t yet be talking about the challenges of memory sharing and race conditions, this topic is reserved for a later blogpost. The point here is just to introduce you to the basic concepts relating to multithreading in the context of C++.
Credits
Before going any further, let me credit the people, software and resources I’ve used in the making of this blogpost:
The practical project / exercise I’ve put at your disposition could not have been possible without the following, in no particular order:
- Visual Studio 2022
- Git and Github
- CMake
- Sergey Yagovstev’s very useful easy_profiler
Although not all explicitly mentioned in the content of this blogpost, the following learning resources were very useful in the making of this blogpost and I encourage you to read / watch them yourself:
- Estimating the value of Pi using Monte Carlo by GeeksForGeeks
- “Compute More in Less Time Using C++ Simd Wrapper Libraries” by Jefferson Amstutz at CppCon 2018
- My personal bible: “Game Engine Architecture” by Jason Gregory. I cannot recommend this book highly enough, if there’s any topic you’ll ever encounter as a Game Programmer, you’ll most probably find inside a very concise explanation of the subject as well as references to other resources where you can find more information on the subject.
- “C++ Concurrency” by Bartosz Milewski
This blogpost uses various images, the sources of which have been marked below them as a hyperlink. Care has been taken to use the images in accordance with the creator’s wishes whenever such information has been made available.
Finally, please keep in mind that I am by no means an expert on the subject, and you spot mistakes or think that some parts of this blogpost need to be adjusted, don’t hesitate to contact me at loshkin.oleg.95@gmail.com.
Definitions (they're handy!)
 A meme edit of “Portrait of Madame Francois Buron” by Jacques-Louis David, taken from www.ranker.com who credits it to the Instagram account the.memes.of.the.books.
Multithreading
For those that are somehow unaware of the concept, multithreading is:
"[...] the ability of a central processing unit (CPU) (or a single core in a multi-core processor) to provide multiple threads of execution concurrently, supported by the operating system."
- Multithreading (computer architecture), Wikipedia, 2022
In simpler terms, it is the basic concept that allows computers to run many subroutines
at once, something that was not possible with earlier computers: early home computers such as the Commodore 64
were incapable of true multithreading,
meaning that these computers were only able to run one program at a time (though later it would become
capable of multitasking with GEOS)].
 Image of a Commodore 64
Running multiple programs simultaneously can be achieved in various ways, and not all of them require a multi-core processor. Your computer for instance is currently running many more programs that your machine has cores as you can see if you open up your task manager:

This is because the OS is using timeslicing and preemptive scheduling to let every program a little bit of time on the CPU to execute partially before letting another program run.
Multiprocessing
In 2001, IBM released the POWER4, the first multi-core CPU as one thinks of one today. It ran at 1.3 GHz and had two symmetric cores on the same CPU die:
This is very different from earlier computer’s multitasking: with a multi-core machine, it can physically run two programs at the same time without interrupting another to do so. With this new advancement, it has become possible to take advantage of a multi-core CPU to speed up complex computations (if done properly).
Indeed, since a CPU nowadays features many cores, we can naively understand that running our program on a single core of our 4-core CPU would theorically result in 1/4 of the potential performance (which is a VERY gross oversimplification by the way, in reality it’s not the case and there’s many factors that come into play, to the point that it is often best to write a single-threaded program unless there’s a proper reason to do otherwise).
Finally, we currently see the exciting popularization of general-purpose GPU computing (GPGPU) which consists in taking advantage of the hugely parallelized computing pipeline of GPUs to greatly accelerate the computing of non-graphics specific tasks when applicable: SteamAudio for instance can use AMD’s GPU’s to accelerate it’s real-time sound simulations and the Playstation 4 has specifically been produced with a more perfomant than strictly necessary GPU to allow games to use the console’s GPU for non-graphics related computations. General-purpose GPU computing however is well beyond the scope of this blogpost.
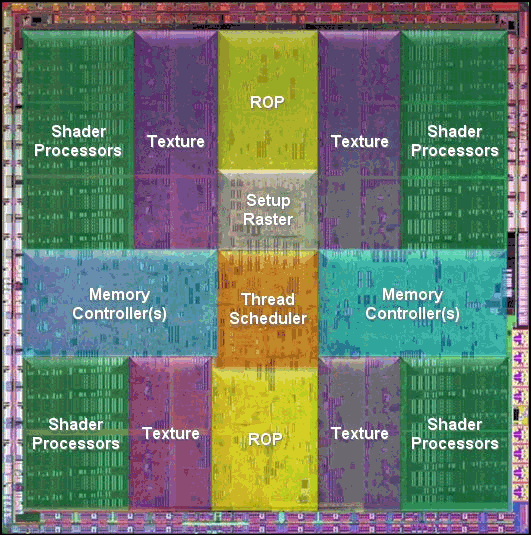 Die of the Nividia’s GT200 GPU
Concurrency and Multitasking vs. Parallelism
 Illustration of parallelism vs. concurrency with images taken from “How to Cut Green Onions” and www.dreamstime.com respecively.
Concurrency and parallelism can sound like synonyms but they are not. Rob Pike, the creator of the Go programming language described the concepts very elegantly in one of his talks:
"Concurrency is about dealing with lots of things at once. Parallelism is about doing lots of things , once."
To give you a more intuitive analogy, concurrency is a bit like cooking a stew: you might start by cutting some beef and set it to sizzle in a pan and pour some water in a pot and set it to boil. While that’s going on, you’d chop up some vegetables and at some point throw all of that good stuff in the boiling water and add some flour to thicken up the stew before adding in the beef. You might then after a while put the pot in the oven for a few hours to let it finish cooking and in the meantime you’d make some potatoes and some homemade sauce (PS: can you tell yet that I’m not exactly a cook?). If you and your friends are all simultaneously doing these different tasks, that would make it an example of concurrency: one might be chopping up the veggies while another might be pre-heating the owen. If you’re alone doing all of these steps sequentially, then technically speaking, it is multitasking instead, but the distinction is rarely made.
Parallelism on the other hand is much simpler: it’s like chopping up some scallions. You’d take a whole bunch of them and chop them all up at once, each motion of the knife cutting the whole bunch at once (which in this specific case would be an analogy for SIMD parallelism by the way). Note that concurrency may or may not be parallel if you think about how this applies to the previous paragraph.
I highly recommend Jason Gregory’s “Game Engine Architecture” book which has a large chapter dedicated to concurrency, multithreading, parallelism and a whole slew of things relating to the topic.
Approximating PI
 Image of a PI pie from a recipe by Jules Douglass.
To get familiar with multithreading and parallelism in C++, we’ll be approximating PI using the Monte Carlo method inspired by GeeksForGeeks’ tutorial. “Monte Carlo analysis” is essentially a fancy way of saying that we’ll be using randomness to progressively approximate the deterministic value of PI.
The idea is fairly simple: generate a whole lot of uniformly distributed random 2D points with component values in the range [-1;1] and this gives you points that lie within the unit square. You then check how many of these points lie inside the unit circle that in inscribed in the unit square. Since we know how to calculate the areas of a square and a circle, we can get a ratio of their areas:
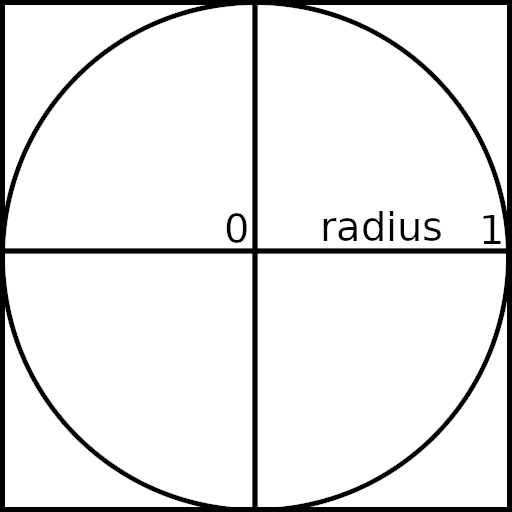
Area of circle = PI * radius * radius
and
Area of square = side * side = (2 * radius) * (2 * radius) = 4 * radius * radius
So we would write the ratio of the two as:
(PI * radius * radius) / (4 * radius * radius)
If we then simplify the expression, we end up with this equation:
Area of circle / Area of square = PI / 4
Since we’re generating A LOT of points, as the number of random points grows, we can approximate the above equation with the following one instead:
Number of points inside the circle / Number of points inside the square = PI / 4
Rearrange the equation and we end up with:
PI = 4 * Number of points inside the circle / Number of points inside the square
As the number of random points grows, using this equation we’ll be getting progressively closer to the true value of PI, theorically reaching it if we somehow managed to generate an infinite amount of random, uniformly distributed points.
But why PI?
 Poor Pingu has eaten too much, taken from www.sharecopia.com
Approximating PI with the Monte Carlo method is a classic example of what is known as an embarrasingly parallel problem: it approximates the value of PI by running a very simple procedure many times over and each step of the iteration is completely independant from the previous. This makes this problem particualrly well suited to introduce you to the parallel computing tools of C++ without yet dealing the challenges of memory sharing and race conditions.
Running the project
 Scene of Forest running from the 1994 movie “Forest Gump”, taken from IMDb’s Pinterest account.
Enough theory, let’s download and setup the project we’ll be working in. First, clone the Github repository I’ve prepared for you: https://github.com/LoshkinOleg/Multithreading_In_Cplusplus_Approximating_Pi
Once that’s done, make an out-of-source CMake build with the CMake’s GUI application (or using the command line if you’re feeling like showing off in front of people that are easily impressed) and make sure to put the build under “/build”: it’s important to name the folder precisely like so for relative paths to work for the tools we’ll be using:
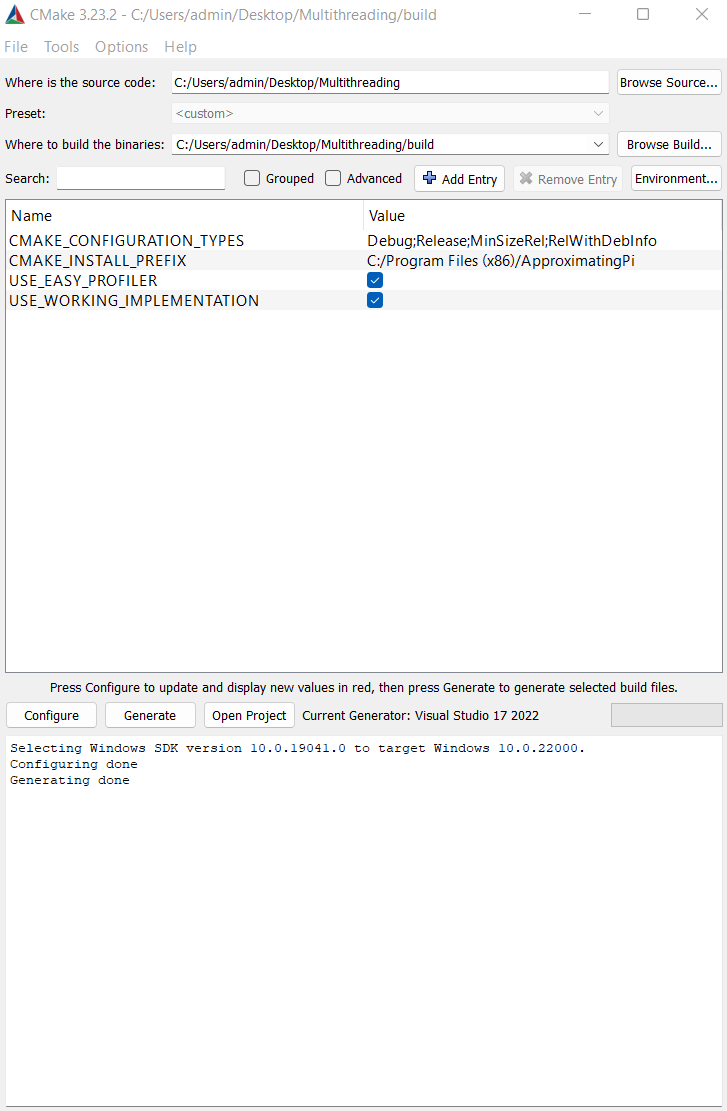
For now, leave all the options at default, I’ll show you around before we start coding. Once you’ve made the out-of-source CMake build, open up the VS solution and set the “Application” project as the Startup one:

And go ahead and compile and launch the application, you should end up with an error message about a missing .dll:

This is because we’ll be using Sergey Yagovstev’s easy_profiler to profile our code
to see whether we’re actually doing things in parallel (which is our goal) and whether our parallel computing is actually more performant than
our baseline single-threaded implementation.
I’ve saved you the trouble of compiling QT and the profiler yourself and have put everything necessary under “thirdparty/easy_profiler/”.
You’ll find the application we’ll be using to visualize the results of the profiler under “/thirdparty/easy_profiler/bin/profilerApp/profiler_gui.exe”, but I’ll introduce you to it a bit later.
To fix the missing .dll error, if you’re on Windows, just run the “moveDlls.bat” script I provided you with at the root of the repository. If you can’t run it, just manually copy the “/thirdparty/easy_profiler/bin/easy_profiler.dll” to “/build/Application/bin/Debug/” and “/build/Application/bin/Release/”, which are empty folders that should exist if you’ve correctly set up the out-of-source CMake build.
Now that it’s done, when you launch the application this time, you should have some approximations of PI being output to the console window:

The exact approximations of PI will vary but should all be around 3.14. But let me show you around the code a bit.
If you open up “/Application/src/main.cpp” you’ll see the code that’s run every time you launch the application,
regardless of whether you’re running my working implementation or running your own.
At the top of the file, you’ve got the USE_WORKING_IMPLEMENTATION define from before being used to include either
“/Application/include/workingImplementation.h” which is a header that implements the PI approximating functions whose result you’ve seen earlier
or to include your own “/Application/include/exercise.h” header where you’ll be writing your own implementation:
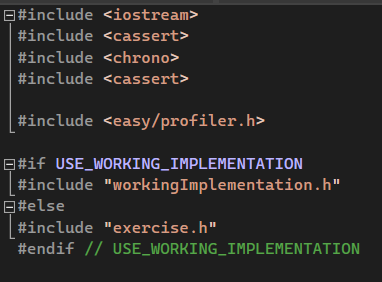
In the body of the main() function, you’ll find some literals of relevance to you: ITERATIONS determines how many points we’ll be using to approximate PI. Add or remove a few 0’s depending on the performance of your machine, the idea is for all the algorithms to take a few moments to execute so that we can clearly see it in the easy_profiler’s GUI but it really doesn’t need to be taking a long time to compute every time you launch the application to see whether things are working, we’re not trying to approximate PI for any practical use here.
Next, NR_OF_WORKERS defines into how many parts we’ll be chopping up the workload into when we’ll be writing the parallel versions of our PI approximating functions. This number should be of: the number of logical cores your CPU has - 2 or any even number below that. You can find the number of logical cores your CPU has in the Task Manager if you’re running Windows:
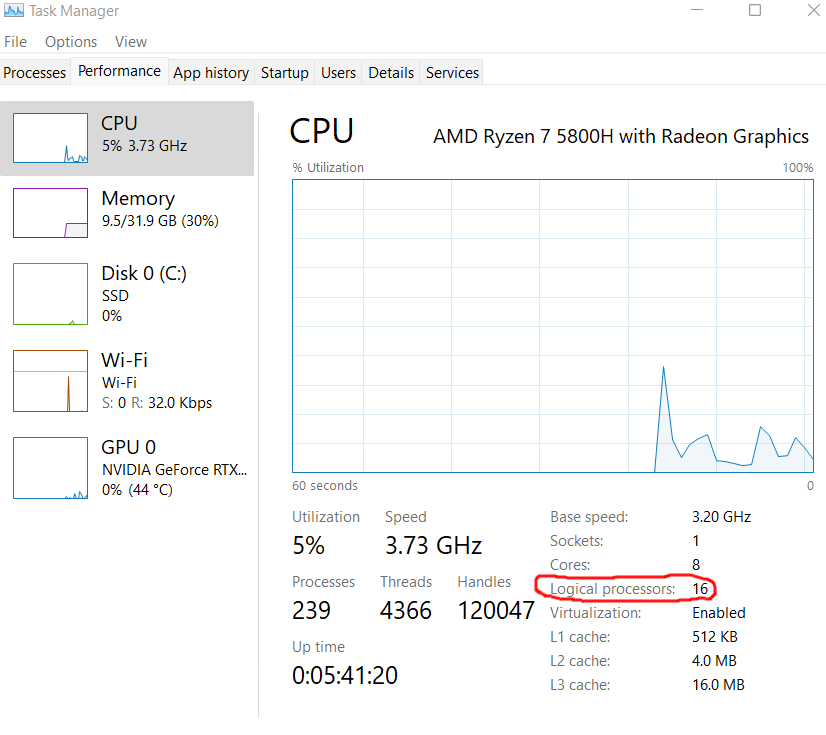
Note that it’s the “logical cores” we’re interested in, not just “cores”, if you’re interested in the distinction, you can read up on it here.
The reason I’m suggesting to set NR_OF_WORKERS to logical cores - 2 is mostly for ease of readability of the profiler’s results: one core would be reserved for running the main thread (the main() function) and the others for running the parallelised PI approximating algorithm. I’m suggesting - 2 rather than - 1 just to ensure that the work can be split very evenly for demonstration’s sake: if the number of worker threads is even, dividing ITERATIONS by NR_OF_WORKERS will always end up in a perfectly even workload split between the cores and more generally will make debugging and wrapping your head around what’s going on just a tid bit easier.
What follows these literals is just some code to actually execute the PI approximating functions and to time them. You’ve already seen that in addition to outputting the approximation, this program also outputs the number of system clock ticks the algorithm has taken to execute.
Finally, if you’ve left BUILD_WITH_EASY_PROFILER enabled in CMake’s GUI, the last bit of code just writes the profiling data to “/build/profilerOutputs/session.prof”. We’ll see later how to use that data to get an idea of what’s going on.
Now that we’ve made sure everything works as indended, go back to CMake’s GUI application and uncheck “USE_WORKING_IMPLEMENTATION” checkbox. This will make the code we just saw use “/Application/include/exercise.h” to approximate PI and if you now run the program again you’ll see that all the approximations will be of 0 since it’s not yet implemented (but hey, at least it’s quick!).
Let's get to implementing!
 Typing furiously, taken from GIFER
SingleThread()
Enough boring stuff, let’s get to writing some code! From now on, I’ll explain step by step how to first implement a single-threaded PI approximating function and then show you how you can take advantage of the highly parallel nature of the problem to accelerate it’s computation by taking advantage of a multi-core modern CPU using only the tools provided by the standard C++ library (C++20 standard in our case).
I highly encourage you to attempt this by yourself at first and only come back to this blogpost if you’re stumped or in need of a hint for how to approach the next part of the task you’re trying to do.
Go ahead and open up “/Application/include/exercise.h”. Inside, you’ll find the three partially implemented functions we’ll be implementing:
- SingleThread() will simply approximate PI entirely on the main thread, we’ll be using it compare our other approaches against.
- Async() will be a parallelised version of SingleThread() that will be using std::async and std::future.
- Threads() will use std::thread, std::future and std::promise to implement the same algorithm without using std::async.
Let’s start by implementing the single threaded version of the algorithm in SingleThread():
I’ve maked where you should write your code with the TODO comment. Before it, you’ll find the random number generator e and the uniform floats distribution d ranging between [-1;1[ (1.0f is exclusive due to some quirk of the standard library but since we’re working with floats, it shouldn’t be much of a problem). There’s also the insideCircle variable which we’ll use to count the number of random points inside the unit circle. At the bottom, of course, is the return statement.
Let’s get to it then! The first step is simple enough: all we need is generate a 2D point defined by two components x and y using the random number generator
and check whether the newly generated 2D point lays inside the unit circle (or on it’s boundary) by computing the magnitude of the vector going from the origin to the point. Since the origin is by definition at (0;0), we can directly pass
x and y to the Magnitude() function I’ve already prepared for you.
If the point is inside the circle, meaning if the magnitude is <= 1.0f, we’ll increment the insideCircle counter.
Very difficult, isn’t it? All that’s left is to apply the formula discussed earlier to approximate PI. Here we can use iterations in place of “Number of points inside the square” since any point resulting from a [1;1] ranging distribution will necessarily be part of a unit square:
PI = 4 * Number of points inside the circle / Number of points inside the square
And that’s it for the SingleThread() function, really:
Before we move on to implementing the other functions, let’s briefly get familiar with easy_profiler’s GUI application. Every time you run the program, it will output
profiling data to “/build/profilerOutputs/session.prof”. Let’s take a look at it in easy_profiler’s GUI application (if you try reading it with a text editor, you’ll see that it’s
all binary).
Navigate to and run “/thirdparty/easy_profiler/bin/profilerApp/profiler_gui.exe” and open up “/build/profilerOutputs/session.prof” by clicking on the folder icon at the top-left of the
window:
Once it’s opened, you’ll be able to navigate in the timeline and see the little profiling blocks that were defined in the code using EASY_BLOCK macros.
For now, as you can see, we’ve only got one thread running and if you mouse over the SingleThread profiling block, you’ll see the time it has taken to execute our newly implemented function:
When we’ll start kicking off (meaning launching) new threads in the following functions, you’ll see more threads there, and with easy_profiler you’ll be able to see which ones execute when! I just want to point out that for the sake of lisibility of this blogpost, I’ve set my NR_OF_WORKERS to 4 instead of the 14 my machine is capable of as I’ve advised before.
Async()
Since we know that approximating PI using the Monte Carlo method is an embarassingly parallel problem, let’s try to make a version of our above function that splits the workload of approximating PI into as many separate threads to effectively use the whole CPU for the task rather than a single core. To do this, we’ll start by using the simplest multithreading facility provided to us by the C++ standard: the std::async. Those familiar with Unity Engine’s C# coroutines will probably find the concept quite similar (although std::async doesn’t provide the ability to “yield”, meaning intentionally returning control to another thread rather than getting interrupted by a context switch: I suggest reading up on the concept of cooperative multitasking if you’re interested): std::async’s allow you to define some arbitrary bit of code to execute and then launch it asynchronously (hence the name), then retrieve the result of the execution when it has finished using a std::future.
While std::async’s are easy to use, it’s important to remember that they are NOT guaranteed to execute the task on a separate core (and neither are std::thread’s) nor even necessarily on a separate thread, that decision is left up to the operating system. As such, std::async are great when you just need to kick off some asynchronous task and don’t really care about the details of where and how that task is running. A typical use of this facility in video-games would be for loading the assets used in a level, for instance, while the game is displaying a loading screen for the player: we wouldn’t want the program to just freeze for ~10 seconds, making the player think that the game has crashed when in reality it’s just loading a large amount of data from the disk. Note that more often, modern game engines might instead implement a job system rather than letting the code monkey behind the screen launch new threads unchecked (that would be you). Let’s try to use std::async’s, shall we?
For those not familiar with this kind of notation, it’s called a lambda expression. If you’re not aware of it, think of it as a
local function (which it isn’t actually by the way, it’s more akin to a weird functor)
where we’ll be defining what one of our worker threads should be doing.
We’ll start by moving e and d inside the scope of the lambda and seed
it with the workerId so that
we don’t end up with each suroutine generating the same exact 2D points which would make our efforts of making the
algorithm parallel pointeless.
We’ll use iterations and nrOfWorkers to split the global workload into smaller chunks, each
subroutine being responsible for generating and analysing iterations / nrOfWorkers number of points.
The subroutine should then return the number of points inside the unit circle for the subset of the total workload it has processed.
This is how you do it:
Now that we’ve defined what our worker threads should be doing, let’s kick them off so that they actually
execute the code we’ve written. It’s important to note that if you’re constructing
an std::async task with the std::launch::async argument, the destructor of the returned std::future becomes a blocking
operation, meaning that the main thread will not
continue execution until the asynchronous task is done which would turn our parallel operation into a sequential
one, so it’s important to store the std::futures aside until we need to retireve the results and not just kick off an std::async and discarding the std::future:
Now that we’ve kicked these tasks off, let’s wait for them to finish executing and retrieve the results and use them to approximate PI, just as before. Note that the std::future.get()
is a blocking operation that only returns once the subroutine has computed a valid result, so all we actually need
to do is call std::future.get() and it’ll block the main thread until a result is retrieved.
Good, let’s launch our program and see how it performs… looking good! If you’ve taken my advice and tried by
starting to implement the Async() yourself, you’ll find the easy_profiler to be quite handy for debugging:

We can see that in our case, the OS has kicked off these tasks on separate threads, but again, that is not guaranteed when using std::async’s!
To demonstrate this, I’ve forced the OS’s hand by splitting the workload into twice the number of logical cores my CPU has, and as expected,
the OS has decided to execute two subroutines per thread instead of one:

This is usually the desired behaviour since the OS knows best how to distribute the computing workload the machine is experiencing at any given time. But what if we want to make sure that one thread is only responsible for one thing, as would be the case for instance in a multithreaded game engine, where it is typical to have a graphical renderer thread or an IO thread or an audio thread, all of them responsible for one specific task only? (This is an instance of task parallelism by the way as opposed to data parallelism which is what we’re doing with approximating PI.)
Thread()
If we explicitly want our tasks to be running on separate threads, we need to go just a little bit lower and start using std::thread’s: this C++ facility is used to represent a single thread of execution of a program and when a task is assigned to it, it won’t share it’s execution time with any other tasks, unlike an std::async. Note however that this DOES NOT map the thread to a CPU core! Trying to do so would involve fighting the OS’ task scheduler and unless you’re a senior OS software engineer (which you are not since your reading this), you won’t manage to outperform it.
In game engines, std::thread’s (or third-party equivalents of it) are usually used as part of so-called “worker thread pool”, where the application, upon startup kicks off as many std::threads as there are logical cores and uses them in a more or less generic manner: adding more threads would only lead to the existing threads cannibalizing each other’s time on the CPU and the only impact you’d see from kicking off more worker threads than you have logical cores would be the added cost of context switching. This is why I’ve instructed you to set NR_OF_WORKERS to the number of logical cores - 2.
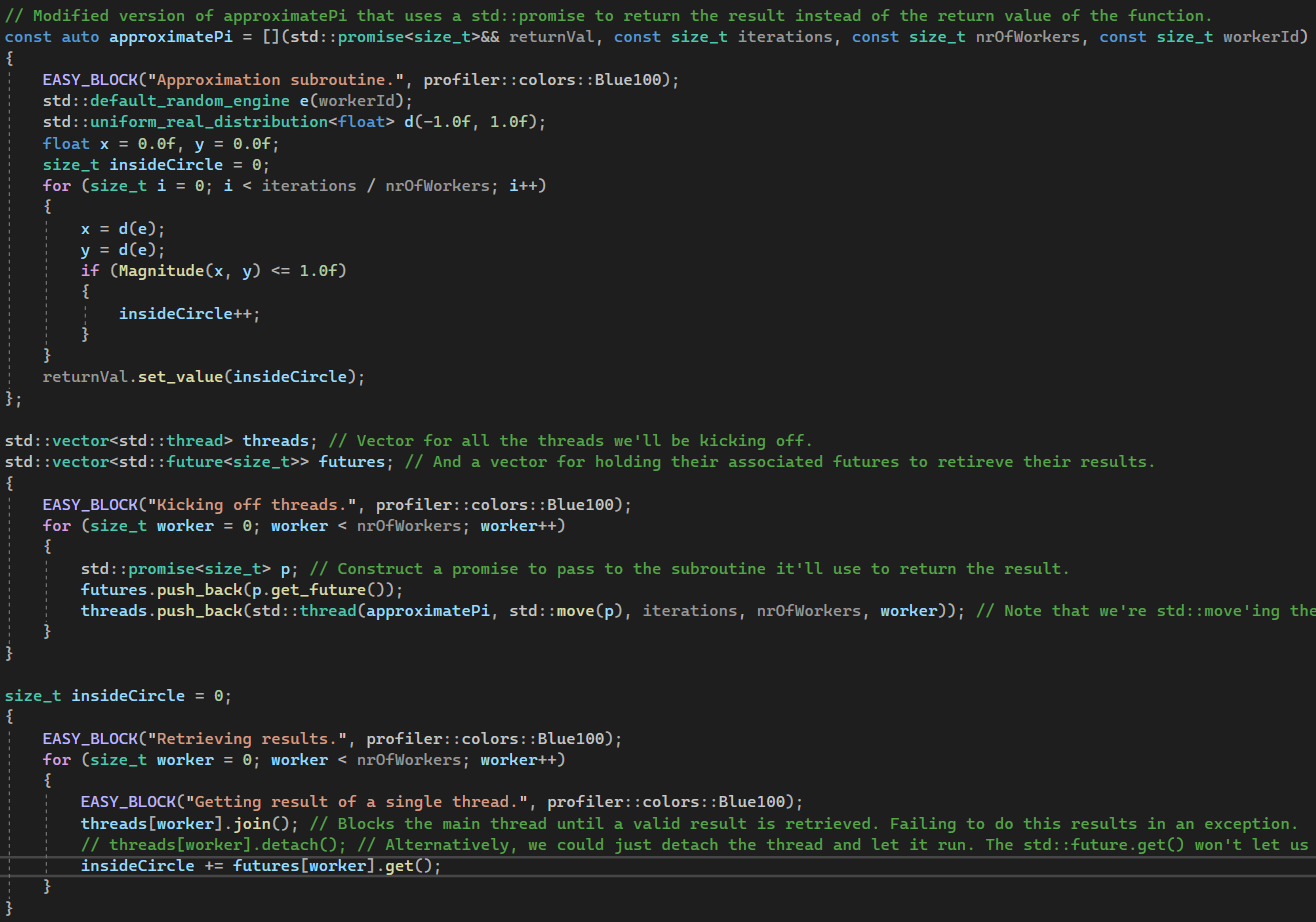
Implementing our algorithm using std::thread’s is very similar to using std::async’s, the only real difference is that you can’t directly get a return value from std::thread’s constructor like you can with std::async and that you need to join it before the std::thread object gets destroyed. To get our return value from an std::thread, we need to first construct a std::promise, get the std::future from it, then std::move it as an argument for the lambda.
Other than that, everything is very similar besides having to call .join() or .detach() on the thread. The .join() is a blocking call that waits for the std::thread to execute and .detach() is used to let the std::thread execute unchecked so that the main thread may continue on with it’s execution without waiting on the other thread. Since std::future.get() is a blocking call that will wait for the return value of the subroutine to become valid anyways, we can call either:
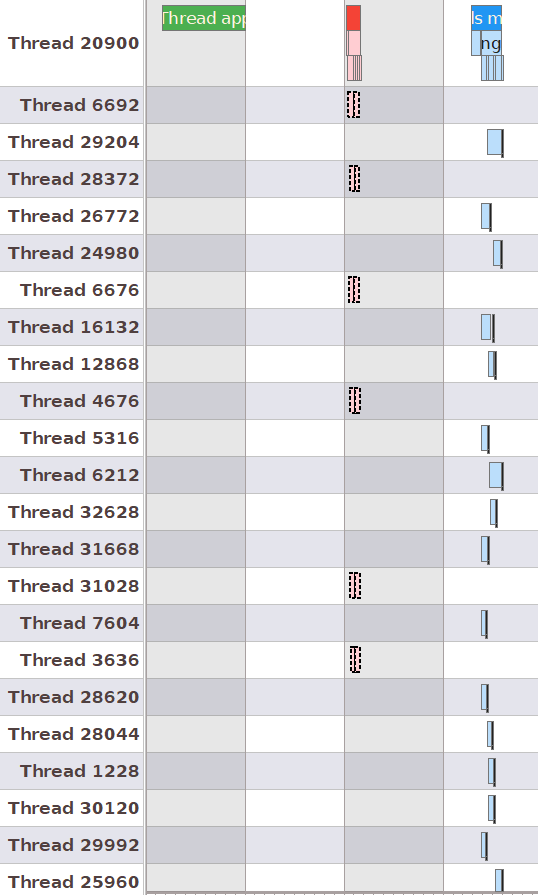
This time, even if we set NR_OF_WORKERS to a number larger than the number of logical cores, we can see that each subroutine is running on it’s own, exclusive little thread. What is hidden away from us is that the OS uses timeslicing to run all of those “simultaneously” (either trully concurrently or in a multitasking manner):
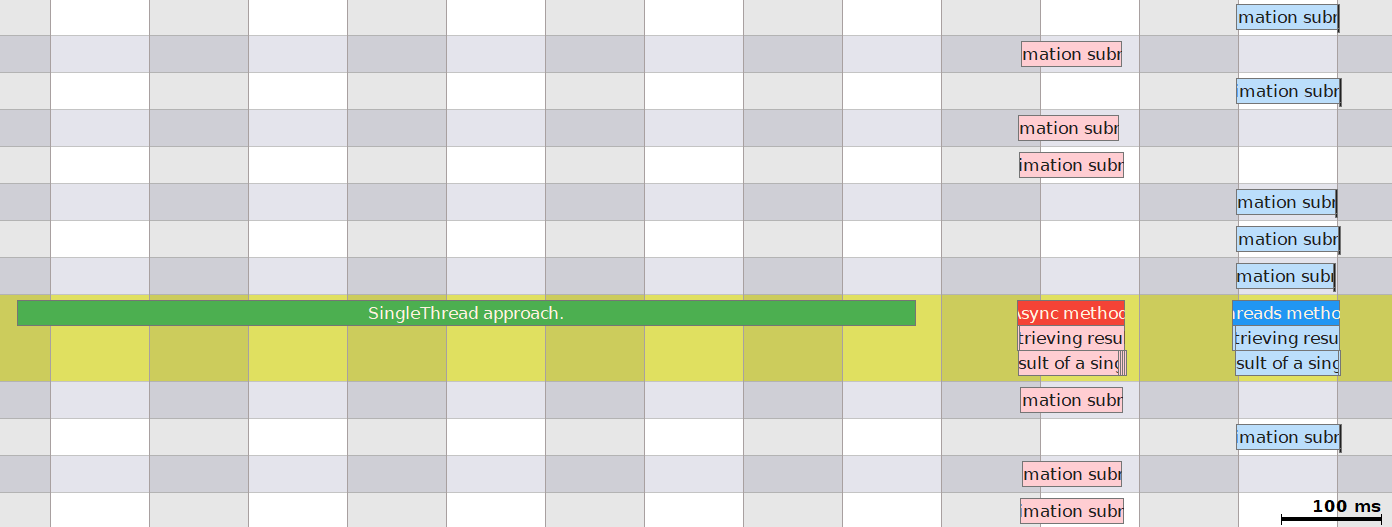
And just for good measure, let’s launch the application one last time in Release mode and look at the results, with 14 worker threads in my case!:

In Conclusion... this is only the beginning!
This blogpost has barely scratched the surface of multithreading, concurrency, multitasking and parallelism. What we’ve done here has been an example of data parallelism we’ve implemented using the concurrency facilities of C++ that have been designed to take advantage of a multiprocessing environment.
There is still A LOT to learn on the subject, the most pressing matter being that of memory sharing, race conditions and thread synchronization. All of this is without even talking about hardware related concurrency and parallelism concepts such as instruction pipelining, superscalar processing or hyperthreading (which is where the concept of logical cores comes from) or the nightmarish world of preventing the compiler and the CPU from executing order-dependent code in an out-of-order manner.
I hope this introduction to multithreading in C++ has been useful to you and stay curious!


